Adding a Contact Form and SEO Settings
A contact form turns passive visitors into potential customers by giving them an easy way to reach you. Combining it with proper SEO settings means search engines can find and rank your site correctly. CyclebreezeHost's Website Builder includes both features without requiring any plugins or external services.
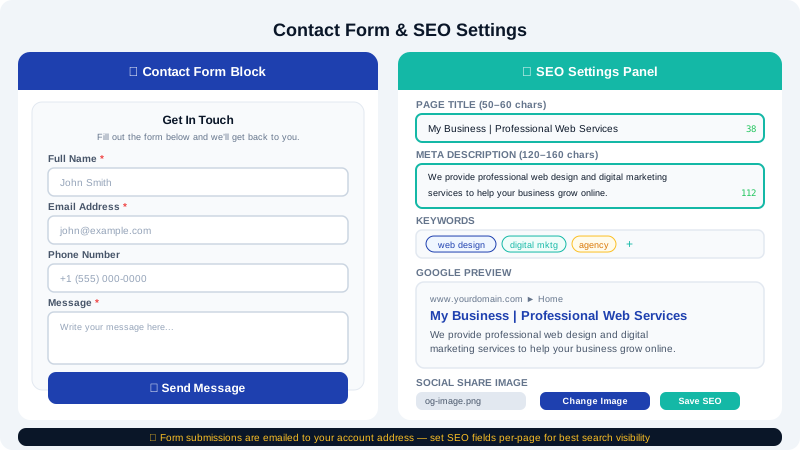
Adding a Contact Form
Step 1 — Insert a Contact Form Section
- Open your site in the Website Builder editor.
- Navigate to the page where you want the form (usually your Contact page or the bottom of your home page).
- Hover between sections at the point where you want the form, then click the + button.
- In the Add Section panel, browse to Contact or search for "form". Select a pre-designed contact section and click to insert it.
Alternatively, drag a Form element from the Elements panel in the left sidebar onto an existing section.
Step 2 — Configure Form Fields
- Click the form in the canvas to select it.
- In the right panel, you will see the list of existing fields (e.g., Name, Email, Message).
- To add a field, click Add Field and choose from field types: text, email, phone, dropdown, checkbox, or text area.
- To remove a field, click the delete icon next to it.
- Mark fields as Required to prevent submission without them.
- Edit each field's Label and Placeholder text by clicking on the field label in the canvas and typing.
Step 3 — Set the Submission Email Address
- Select the form and open its settings in the right panel.
- Find Email Notifications or Send To.
- Enter the email address where form submissions should be delivered (e.g.,
info@yourdomain.comorsupport@yourdomain.com). - Optionally, set a Reply-To field to your visitor's email address so you can reply directly.
- Customise the Email Subject (e.g.,
New enquiry from your website).
Step 4 — Customise the Success Message
After a visitor submits the form, a confirmation message is shown. To edit it:
- Select the form and look for Success Message in the settings panel.
- Update the text to something reassuring, e.g., "Thank you for getting in touch! We will respond within one business day."
Configuring SEO Settings
Good SEO settings tell search engines what each page is about, helping your site appear in relevant search results.
Site-Wide SEO Settings
- In the editor, open Site Settings from the top toolbar or left sidebar.
- Navigate to the SEO section.
- Fill in:
- Site Name — your business name (e.g.,
CyclebreezeHostorYour Company Name) - Site Description — a 1–2 sentence summary of what your business does (under 160 characters)
- Favicon — upload a small square logo (16×16 or 32×32 px) that appears in browser tabs
- Site Name — your business name (e.g.,
Per-Page SEO Settings
Each page should have its own title and description:
- Open the Pages panel and click the settings icon next to a page.
- Find the SEO or Search Engine tab.
- Fill in:
- Page Title — the heading shown in search results. Include your main keyword and brand name (e.g.,
Web Hosting South Africa | YourCompany). Keep it under 60 characters. - Meta Description — the snippet shown under the title in search results. Summarise the page in under 160 characters and include a call to action.
- URL Slug — the page's path in the URL (e.g.,
/about,/services). Use lowercase words separated by hyphens; avoid spaces or special characters.
- Page Title — the heading shown in search results. Include your main keyword and brand name (e.g.,
Social Sharing (Open Graph)
When your pages are shared on social media, the Open Graph settings control the title, description, and preview image displayed in the link card:
- In per-page SEO settings, look for Social Share or Open Graph.
- Upload a Social Image — a 1200×630 px image relevant to the page (your logo, a hero photo, etc.).
- Optionally override the OG Title and OG Description with a more social-friendly version of your SEO text.
Publishing Your Changes
After adding your contact form and updating SEO settings, click Save then Publish to push the changes live. See Publishing and Updating Your Website for more detail.
Testing the Contact Form
Before sharing your site, send a test submission through your contact form and confirm:
- The confirmation message displays correctly.
- A notification email arrives at the address you configured.
- If no email arrives, check your spam folder; CyclebreezeHost support can also help verify your email delivery settings.
For any help with forms or SEO, contact CyclebreezeHost support at info@cyclebreezehost.com or open a ticket at https://clients.cyclebreezehost.com — available 24/7.