Avoiding the Spam Folder and Blacklists
When legitimate emails end up in recipients' spam folders — or worse, get rejected entirely — it affects your communication and business reputation. Most deliverability problems come from missing authentication records, poor sending practices, or a blacklisted IP. This guide covers the steps to maximise deliverability for mail sent from your CyclebreezeHost account.
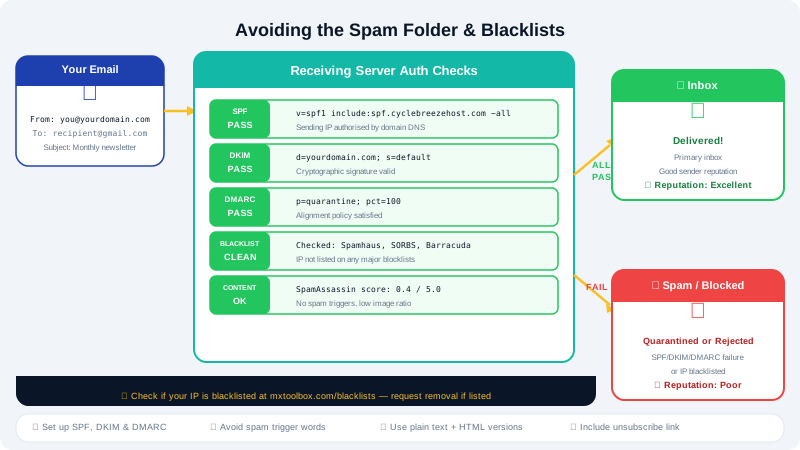
Step 1 — Set Up SPF
An SPF (Sender Policy Framework) record tells receiving mail servers which servers are authorised to send email on behalf of your domain.
- Log in to cPanel via the Client Area at https://clients.cyclebreezehost.com.
- Go to Zone Editor and click Manage next to your domain.
- Look for an existing
TXTrecord containingv=spf1. If one exists, edit it. If not, add a new TXT record. - Set the Name to
yourdomain.com.and the Value to:
v=spf1 include:yourdomain.com ~all
For CyclebreezeHost's cPanel servers, a typical value is:
v=spf1 a mx ~all
This authorises your hosting server's IP (the a record) and your MX hosts. If you also send mail through a third-party service (e.g. Mailchimp), add their SPF include value as well.
Step 2 — Enable DKIM
DKIM (DomainKeys Identified Mail) cryptographically signs outgoing messages. Recipients can verify the signature to confirm the message hasn't been tampered with.
- In cPanel, go to Email and click Email Deliverability.
- If the status shows Problems Exist, click Repair to auto-generate and publish the DKIM record.
- If DKIM is already active, the status shows Valid DKIM record.
Step 3 — Configure DMARC
DMARC (Domain-based Message Authentication, Reporting & Conformance) tells receiving servers what to do with messages that fail SPF or DKIM checks.
Add a new TXT record in Zone Editor:
- Name:
_dmarc.yourdomain.com. - Value:
v=DMARC1; p=quarantine; rua=mailto:dmarc-reports@yourdomain.com
Start with p=quarantine to quarantine suspect messages, and graduate to p=reject once you are confident your legitimate mail is signing correctly.
Step 4 — Check the Email Deliverability Tool
cPanel's built-in tool checks all your authentication records at once:
- In cPanel, go to Email > Email Deliverability.
- Review the status for SPF, DKIM, and PTR (reverse DNS) records.
- Click Repair on any item flagged with a warning.
Step 5 — Avoid Common Sending Mistakes
Even with correct authentication, the content and habits of your sending can trigger spam filters:
- Do not use misleading subject lines. Subjects like "You've won!" or excessive punctuation are common spam triggers.
- Avoid spam trigger words in the body — phrases like "FREE!!!", "Act Now", or "Click here" are heavily weighted by spam filters.
- Include a physical address in marketing emails (required by anti-spam laws in many countries).
- Include an unsubscribe link in any bulk or marketing email. Failure to do so increases spam complaints.
- Don't send to purchased lists. High bounce and complaint rates damage your sender reputation.
- Warm up a new IP or domain gradually — don't send thousands of emails on the first day.
Step 6 — Check Blacklists
If your emails are being rejected, your server's IP may be on a blacklist:
- Visit
https://mxtoolbox.com/blacklists.aspxand enter your domain or IP. - If you are listed, follow the removal instructions on the relevant blacklist's website.
- Address the underlying issue (spam complaints, open relay, malware) before requesting removal.
Step 7 — Monitor Bounce Reports
Set up a DMARC reporting address (as in Step 3) to receive aggregate reports. These reports show you which sources are sending email claiming to be your domain and whether they are passing authentication checks.
Need Help?
Contact CyclebreezeHost support at info@cyclebreezehost.com or open a ticket in the Client Area — our team is available 24/7.