Connecting Your Site to Cloudflare
Cloudflare sits between your visitors and your CyclebreezeHost server, acting as a reverse proxy that caches static content, filters malicious traffic, and routes requests through a global network of data centres. Adding Cloudflare can reduce load times for international visitors, absorb DDoS traffic before it reaches your server, and provide an extra firewall layer — all without changing your hosting setup.
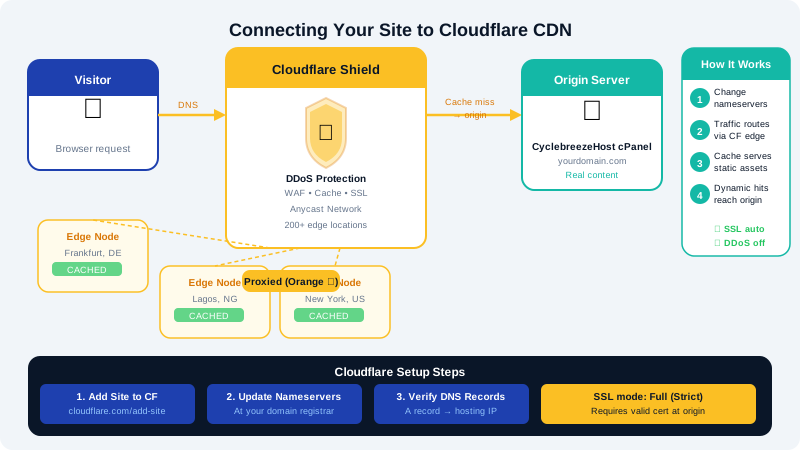
How It Works
When you point your domain's nameservers to Cloudflare, all DNS queries for your domain resolve through Cloudflare's network. Cloudflare fetches content from your CyclebreezeHost server and serves cached copies to visitors from its nearest edge location. Your origin server's IP address is hidden from the public internet.
Prerequisites
- A domain registered or transferred to your control (nameservers must be changeable).
- A free or paid Cloudflare account at
cloudflare.com. - Access to your CyclebreezeHost cPanel to note your server IP and existing DNS records.
Step 1 — Note Your Current DNS Records
Before switching nameservers, record your existing DNS configuration so nothing is missed.
- Log in to cPanel at
clients.cyclebreezehost.com. - Go to Domains → Zone Editor.
- Click Manage next to your domain.
- Note all existing records — especially
A,CNAME,MX(mail), andTXTrecords.
Step 2 — Add Your Site to Cloudflare
- Log in to your Cloudflare account and click Add a Site.
- Enter your domain name and click Continue.
- Select a plan (the free plan is sufficient for most sites) and click Continue.
- Cloudflare scans your existing DNS and imports records automatically. Review the imported records and verify they match what you noted from cPanel.
- Pay close attention to MX records — if your email is hosted at CyclebreezeHost, these must be present and accurate or mail will stop flowing.
- Click Continue.
Step 3 — Update Your Nameservers
Cloudflare provides two custom nameservers (e.g., aria.ns.cloudflare.com and bob.ns.cloudflare.com). You need to replace your domain's current nameservers with these.
- If your domain is registered through CyclebreezeHost/WHMCS: Log in to the client area at
clients.cyclebreezehost.com, go to Domains, click your domain, and find Nameservers. Replace the existing entries with the Cloudflare nameservers. - If registered elsewhere: Log in to that registrar's control panel and update the nameservers there.
DNS propagation typically takes between 5 minutes and 48 hours. Cloudflare will email you when it detects the change.
Step 4 — Configure Cloudflare Settings
Once active, review these settings in the Cloudflare dashboard:
SSL/TLS Mode
Go to SSL/TLS → Overview and set the encryption mode:
| Mode | When to use |
|---|---|
| Flexible | No SSL certificate on the origin (not recommended) |
| Full | Self-signed certificate on origin |
| Full (Strict) | Valid certificate on origin — use this with CyclebreezeHost AutoSSL |
CyclebreezeHost provides free Let's Encrypt certificates via AutoSSL. Set the mode to Full (Strict) for end-to-end encryption.
Always Use HTTPS
Under SSL/TLS → Edge Certificates, enable Always Use HTTPS to redirect all http:// requests to https://.
Caching
Under Caching → Configuration, the Standard caching level is appropriate for most sites. Static assets (images, CSS, JS) are cached at the edge; HTML pages are not cached by default, ensuring visitors always get fresh content.
Firewall / Security Level
Under Security → Settings, the default Medium security level blocks most known bad actors. Raise it to High if you are actively under attack.
Step 5 — Exclude the Mail Subdomain from Proxy
Email does not work through the Cloudflare HTTP proxy. In your Cloudflare DNS settings:
- Find the
mailsubdomain record (e.g.,mail.yourdomain.com). - Click the orange cloud icon next to it to turn it grey (DNS only).
This ensures mail clients connect directly to CyclebreezeHost's mail server without going through Cloudflare.
Verifying the Setup
- Visit your site in a browser and confirm it loads over HTTPS.
- Send a test email to and from your domain to confirm mail is working.
- In your browser developer tools, check response headers for
cf-ray— its presence confirms traffic is routing through Cloudflare.
For help with DNS configuration or AutoSSL after enabling Cloudflare, contact CyclebreezeHost support at info@cyclebreezehost.com. The team is available 24/7.