Creating a New cPanel Account in WHM
Each client you host gets their own isolated cPanel account. You create and manage these accounts from WHM. This article walks you through the full process of creating a new account, explaining each field and what it means for your client.
Before You Begin
- Make sure you have at least one hosting package created in WHM. If you have not done this yet, see the article Creating Hosting Packages in WHM first.
- Have the client's domain name ready. The domain does not need to be registered with CyclebreezeHost — it can be registered anywhere.
Creating the Account
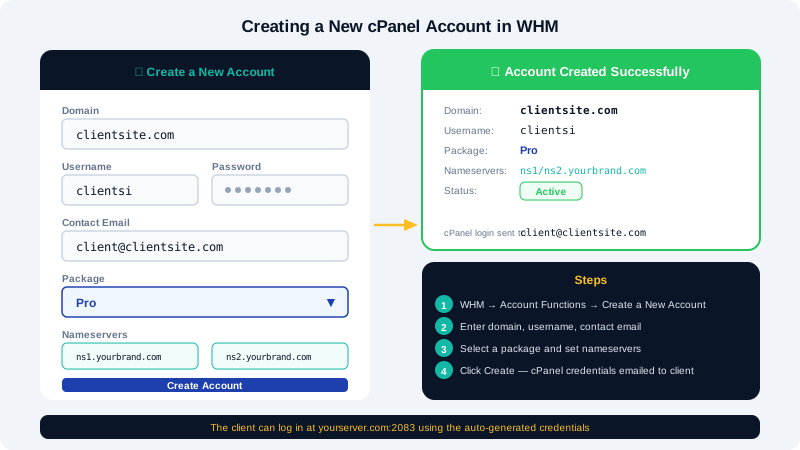
- Log in to WHM at
https://yourserver:2087. - In the left-hand search bar, type
Create a New Accountand click the result, or navigate to Account Functions > Create a New Account. - Fill in the fields as described below.
- Click Create at the bottom of the page.
Field Reference
Domain Information
| Field | What to Enter |
|---|---|
| Domain | The client's primary domain name, e.g. example.com (no http:// or www) |
| Username | Auto-generated from the domain; you can edit it. Must be 8 characters or fewer and lowercase. |
| Password | Set a strong password for the cPanel account, or use the Password Generator. |
| The client's email address — used for cPanel notifications and password resets. |
Tip: Share the cPanel login credentials with your client securely. Consider using a password manager or encrypted email.
Package
Select a package from the Choose a Package dropdown. This applies the disk space, bandwidth, and feature limits you defined earlier. If you need custom limits for this account only, you can set them manually by leaving the package selector on Manual — but using packages is recommended for consistency.
Settings
| Field | Recommended Setting |
|---|---|
| cPanel Theme | paper_lantern or your preferred theme |
| Locale | Match your client's language preference |
| Enable Shell Access | Leave off unless the client specifically needs SSH access |
| Reseller Privileges | Leave off unless you are creating a sub-reseller account |
DNS Settings
| Field | What It Does |
|---|---|
| Enable DKIM | Adds a DKIM record to improve email deliverability — leave on |
| Enable SPF | Adds an SPF record to reduce spam rejection — leave on |
If you have set up private nameservers, WHM will automatically use them when creating the DNS zone for this account.
After the Account Is Created
WHM displays a summary screen confirming the account details, including:
- The cPanel login URL (typically
https://yourdomain.com:2083or via a direct login link) - The assigned IP address
- DNS zone status
You should share the following with your client:
- cPanel URL:
https://theirdomain.com:2083or via a direct login link - Username: as set during creation
- Password: as set during creation
- Nameservers: your private nameservers (e.g.
ns1.yourbrand.com/ns2.yourbrand.com)
Changing Account Settings After Creation
To modify an account after it has been created:
- Go to Account Functions > Modify an Account in WHM.
- Search for the account by domain or username.
- Update any field — package, resource limits, email, or password — and click Save.
Viewing All Accounts
Navigate to Account Information > List Accounts to see every cPanel account you manage. From this screen you can click through to any account, log in directly without a password, or initiate a suspension or termination.
Logging In as a Client (Without Their Password)
- Go to Account Information > List Accounts.
- Find the client's account and click the cPanel icon next to it.
- You are logged in instantly — useful for troubleshooting on behalf of a client.
For assistance with account creation or any WHM issue, CyclebreezeHost support is available 24/7 at info@cyclebreezehost.com or via https://clients.cyclebreezehost.com.