Creating a WordPress Staging Site
A staging site is a private copy of your live WordPress site where you can test updates, theme changes, new plugins, or design modifications without any risk to your production site. Once you are satisfied with the changes, you push them live. This workflow prevents unexpected downtime and broken pages caused by untested changes.
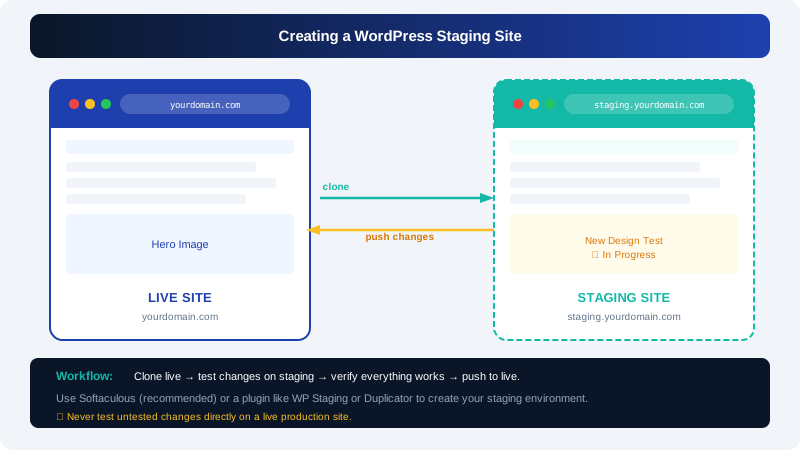
Why Use a Staging Site?
- Test major plugin or theme updates before applying them to your live site
- Develop new features or redesigns without affecting visitors
- Experiment with configuration changes safely
- Verify that everything works correctly after a WordPress core update
Method 1: Clone via Softaculous (Recommended)
Softaculous can clone your live WordPress installation to a subdomain in a few clicks.
Step 1: Create a Subdomain
- Log in to cPanel via clients.cyclebreezehost.com.
- Click Subdomains.
- Enter a name such as
stagingin the subdomain field (this createsstaging.yourdomain.com). - cPanel will auto-fill the document root. Click Create.
Step 2: Clone the Installation
- In cPanel, open Softaculous Apps Installer.
- Click WordPress in the left sidebar, then go to Installations.
- Find your live site and click the Clone icon (two overlapping pages).
- Under Choose Protocol, select the protocol for the staging URL.
- Under Choose Domain, select
staging.yourdomain.com. - Leave In Directory blank.
- Click Clone Installation.
Softaculous copies all files and the database to the new subdomain. The process typically takes one to two minutes depending on site size.
Step 3: Restrict Access to the Staging Site
Your staging site is publicly accessible by default. Prevent search engines and unauthorised users from viewing it.
Option A — Password protect with cPanel:
- In cPanel, click Directory Privacy.
- Navigate to the staging subdomain's document root folder.
- Tick Password protect this directory, enter a label, and click Save.
- Set a username and password, then click Save again.
Option B — Disallow indexing via robots.txt:
Add a robots.txt file to the staging root with:
User-agent: *
Disallow: /
Method 2: Clone with a Plugin
If you prefer to manage staging from within WordPress, several plugins can handle the clone and push workflow.
- Install a staging plugin such as WP Staging from Plugins > Add New Plugin.
- After activation, go to WP Staging in the left menu and click Create New Staging Site.
- Follow the wizard — it will scan your files and database and create a clone in a subfolder (e.g.
yourdomain.com/wp-staging-yourdomain). - Access the staging site from the WP Staging dashboard.
The free version of WP Staging creates the clone; the premium version adds a push-to-live feature.
Working on Your Staging Site
Once your staging site is running:
- Make all changes, installs, or updates on the staging site first.
- Test thoroughly — check key pages, forms, checkout flows, and any custom functionality.
- Check that the site looks correct on both desktop and mobile.
Pushing Changes Live
Via Softaculous:
- In Softaculous, go to WordPress > Installations.
- Click the Clone icon on the staging installation.
- Clone back to the live domain, overwriting the existing installation.
Important: Back up your live site immediately before pushing staging changes live. Use the Backup icon in Softaculous on your live installation before proceeding.
Via WP Staging (premium): Use the built-in Push feature to selectively push files, database changes, or both from staging to live.
Keeping Staging in Sync
Staging sites drift from the live site over time as new content is added. Before testing any significant change, re-clone from the live site to ensure you are working with a current copy.
If you need help setting up a staging environment, contact CyclebreezeHost support at info@cyclebreezehost.com — we are available 24/7.