Creating Private Nameservers and Glue Records
Private nameservers (also called custom nameservers or branded nameservers) let you present your own domain's nameservers — such as ns1.yourdomain.com — instead of the default CyclebreezeHost nameservers. This is particularly useful for web designers, agencies, and resellers who want a professional appearance or need to manage DNS for multiple client sites under a consistent brand.
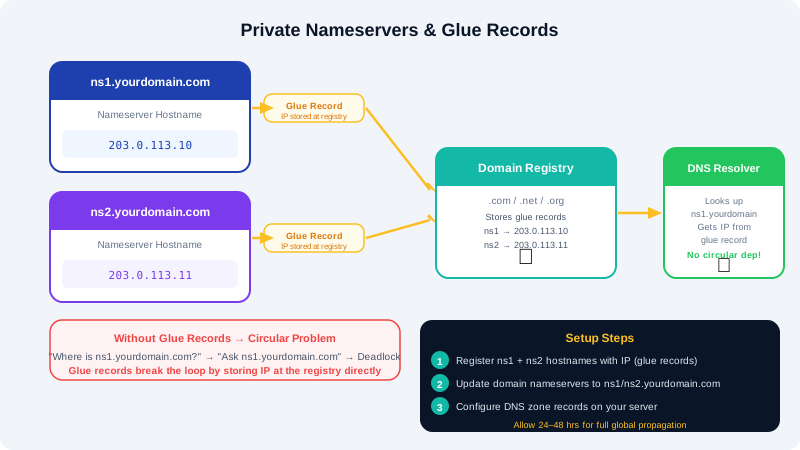
How Private Nameservers Work
A standard domain points to nameservers like ns1.cyclebreezehost.com. When you create private nameservers, you register ns1.yourdomain.com as a nameserver hostname and assign it an IP address. Because ns1.yourdomain.com is itself within the domain it is serving, the registry needs to store its IP address directly — this special record is called a glue record. Without a glue record, DNS resolvers would reach a circular dependency trying to find the nameserver.
Prerequisites
- The domain you want to use for custom nameservers must be registered at CyclebreezeHost.
- You need at least one server IP address (the hosting server your site runs on, or a dedicated DNS server). Your hosting IP address is visible in cPanel or in your welcome email.
- You should create a minimum of two nameservers (
ns1andns2) pointing to separate IPs for redundancy. If you only have one server, some registries permit both nameservers to share the same IP, though this is not ideal.
Step 1 — Register the Nameserver Hostnames (Glue Records)
- Log in to the Client Area at https://clients.cyclebreezehost.com.
- Go to Domains > My Domains and click the domain you are using for nameservers.
- In the left-hand menu, click Private Nameservers or Register Nameserver.
- In the Hostname field, enter
ns1(the full hostname will appear asns1.yourdomain.com). - In the IP Address field, enter the IP address for this nameserver.
- Click Save or Register Nameserver.
- Repeat the process for
ns2, using a second IP if available.
The registry will create glue records linking ns1.yourdomain.com and ns2.yourdomain.com to the IP addresses you provided. Glue records typically propagate within a few hours, but can take up to 24 hours globally.
Step 2 — Update the Domain to Use Its Own Nameservers
Once the glue records are in place, you can point the domain itself (and any other domains) to your new private nameservers:
- Open the domain management page in the Client Area.
- Click Nameservers in the left-hand menu.
- Select Custom Nameservers.
- Enter
ns1.yourdomain.comandns2.yourdomain.comin the nameserver fields. - Click Update Nameservers.
Allow up to 24–48 hours for full global DNS propagation.
Step 3 — Configure DNS Records on Your Server
Your private nameservers now handle DNS queries for any domain that uses them. You need to ensure the correct DNS zone records are configured on your server. If your hosting is cPanel-based:
- Log in to cPanel.
- Open Zone Editor under the Domains section.
- Verify that the
Arecord for your domain points to the correct server IP, and thatMXrecords for email are correct. - Add or edit records as needed for any other domains delegated to your nameservers.
Modifying or Deleting a Private Nameserver
To change the IP address of an existing nameserver or remove it:
- Return to Private Nameservers in the Client Area.
- Click the Edit or Delete icon next to the nameserver you want to modify.
- Enter the new IP address and save, or confirm the deletion.
Warning: Deleting a glue record before updating all domains that use that nameserver will cause those domains to stop resolving. Always update the dependent domains first.
Troubleshooting
| Symptom | Likely Cause | Action |
|---|---|---|
| Site not loading after switch | DNS still propagating | Wait up to 48 hours |
NXDOMAIN errors | Glue record not yet active | Confirm registration was saved; wait and retry |
| One nameserver not responding | Server/firewall issue | Check that port 53 (UDP/TCP) is open on your server |
For further assistance, contact info@cyclebreezehost.com or open a ticket in the Client Area.