Getting Started with Your VPS
Once CyclebreezeHost provisions your VPS or dedicated server, you have a clean Linux environment ready to configure. This guide walks you through the first things to do after you receive your server credentials — from logging in for the first time to getting your server ready to host websites or applications.
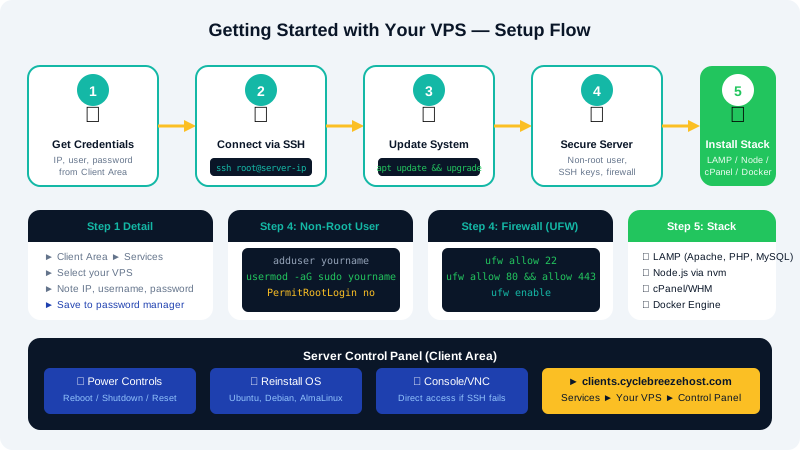
Step 1 — Find Your Server Credentials
Your server's IP address, root password, and chosen operating system are displayed in your CyclebreezeHost Client Area.
- Log in at https://clients.cyclebreezehost.com.
- Go to Services and click your VPS or dedicated server.
- Note the IP address, username (usually
root), and the password that was emailed to you at provisioning.
Keep these credentials somewhere secure — a password manager is strongly recommended.
Step 2 — Connect via SSH
Connect to your server from a terminal using:
ssh root@your-server-ip
For full instructions, including Windows options and SSH key setup, see the How to Connect to Your VPS via SSH article.
Step 3 — Update the Operating System
The first thing to do on any fresh server is apply all available updates. This patches known vulnerabilities before you expose the server to the internet.
On Ubuntu or Debian:
apt update && apt upgrade -y
On AlmaLinux or CentOS:
dnf update -y
This may take a few minutes. Reboot after a kernel update:
reboot
Step 4 — Create a Non-Root User
Running everything as root is a security risk. Create a regular user with sudo privileges for day-to-day tasks:
On Ubuntu/Debian:
adduser yourname
usermod -aG sudo yourname
On AlmaLinux/CentOS:
adduser yourname
usermod -aG wheel yourname
passwd yourname
Log out and back in as the new user to confirm it works before you disable root login.
Step 5 — Secure SSH Access
- Change the default SSH port in
/etc/ssh/sshd_configby settingPort 2222(or another non-standard port) to reduce automated scan noise. - Disable root login by setting
PermitRootLogin noin the same file once your non-root user is confirmed. - Set up SSH key authentication and then set
PasswordAuthentication no. - Restart SSH after any changes:
systemctl restart sshd
Step 6 — Configure the Firewall
Set up a basic firewall to allow only the traffic your server needs. On Ubuntu/Debian:
ufw allow 22
ufw allow 80
ufw allow 443
ufw enable
See the Managing Your Server Firewall article for detailed firewall configuration instructions.
Step 7 — Set a Hostname
Give your server a descriptive hostname:
hostnamectl set-hostname your-hostname
Update /etc/hosts to match:
127.0.1.1 your-hostname
Step 8 — Install Your Control Panel or Stack
Depending on your use case, install the software you need:
| Use Case | Common Choice |
|---|---|
| Web hosting with cPanel/WHM | Purchase cPanel licence, run the installer |
| Manual LAMP/LEMP stack | apt install apache2 php mysql-server or equivalent |
| Node.js application | Install Node.js via nvm |
| Docker workloads | Install Docker Engine and Docker Compose |
CyclebreezeHost can license cPanel/WHM for your VPS — contact support to add it to your account.
Using the Server Control Panel
Your CyclebreezeHost Client Area includes access to a server control panel that lets you:
- Power your server on, off, or reboot it
- Reinstall the operating system
- Open a console/VNC session if SSH is unreachable
- Monitor bandwidth and resource usage
Access it by logging in to https://clients.cyclebreezehost.com, selecting your server, and clicking Server Control Panel.
If you need help with any of these steps, contact CyclebreezeHost support at info@cyclebreezehost.com or open a ticket at https://clients.cyclebreezehost.com. Our team is available 24/7.