Managing DNS Zones in WHM
Every cPanel account you create automatically gets a DNS zone — a set of records that tell the internet where to find that domain's website, mail server, and other services. As a reseller, you can view and edit DNS zones for any account in your WHM. This article explains how to manage zones, edit records, and use zone templates to speed up account setup.
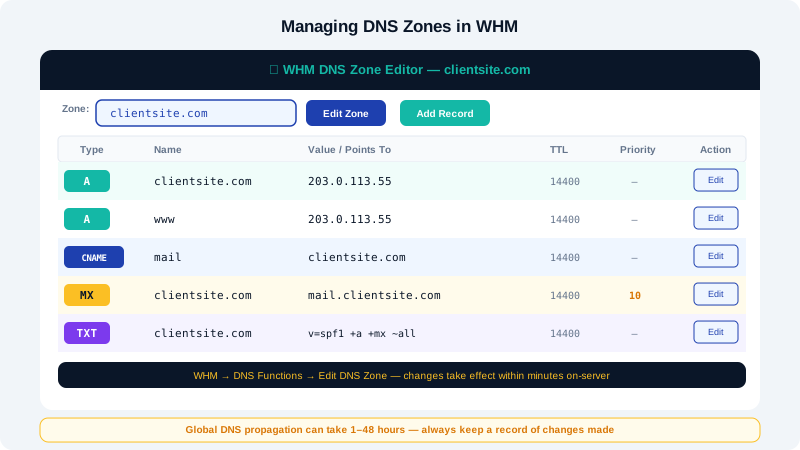
Understanding DNS Records
Before making changes, it helps to know the common record types:
| Record Type | Purpose | Example |
|---|---|---|
| A | Maps a hostname to an IPv4 address | example.com → 203.0.113.10 |
| AAAA | Maps a hostname to an IPv6 address | example.com → 2001:db8::1 |
| CNAME | Creates an alias pointing to another hostname | www → example.com |
| MX | Specifies the mail server for the domain | mail.example.com (priority 10) |
| TXT | Stores text data — used for SPF, DKIM, verification | v=spf1 include:... |
| NS | Nameserver records for the zone | ns1.yourbrand.com |
Viewing a DNS Zone
- Log in to WHM at
https://yourserver:2087. - Navigate to DNS Functions > Edit DNS Zone.
- Select the domain from the list and click Edit.
You will see the full zone file with all current records. Scroll through to find the record you want to change.
Editing a DNS Record
- From the Edit DNS Zone screen, locate the record you want to change.
- Click the field you want to edit — most fields are inline-editable.
- Make your change (e.g., update the IP address in an A record).
- Click Save at the bottom of the page.
Changes to DNS records typically propagate across the internet within 15 minutes to a few hours, depending on the TTL (Time To Live) value of the record.
Adding a New DNS Record
- Scroll to the bottom of the Edit DNS Zone page.
- Fill in the fields for the new record:
- Name — The hostname (e.g.,
mailorshop) - TTL — Leave as default (
14400) unless you have a specific reason to change it - Class — Leave as
IN - Type — Select
A,CNAME,MX,TXT, etc. - Address / Value — The target IP address or value for the record
- Name — The hostname (e.g.,
- Click Add Record and then Save.
Deleting a DNS Record
- On the Edit DNS Zone page, find the record you want to remove.
- Tick the checkbox on the far right of that row.
- Scroll to the bottom and click Save. Records with the delete checkbox ticked will be removed.
Caution: Deleting the wrong record — particularly an A record or MX record — can take a website offline or break email delivery. Double-check before deleting.
Resetting a DNS Zone to Default
If a zone has been badly misconfigured, you can reset it:
- Navigate to DNS Functions > Reset a DNS Zone in WHM.
- Select the domain and click Reset Zone.
- WHM will regenerate the zone based on the account's current configuration (IP address, mail settings, etc.).
This is a useful recovery option, but be aware it will remove any custom records you have added.
Using Zone Templates
Zone templates let you define a standard set of DNS records that are automatically applied to every new cPanel account you create — useful if you want to pre-configure records for a third-party email provider or a CDN.
- In WHM, navigate to DNS Functions > Edit Zone Templates.
- Select standardvirtualftp (the default template used for new accounts) or create a custom one.
- Add, edit, or remove records as needed.
- Save the template.
New accounts created after saving the template will have these records added automatically.
Common DNS Tasks
Point a subdomain to a different server: Add a new A record with the subdomain as the hostname and the external server's IP as the value.
Add Google Workspace or Microsoft 365 email: Replace the default MX records with those provided by Google or Microsoft. Also add the required SPF and DKIM TXT records they supply.
Verify domain ownership for a third-party service: Add a TXT record with the verification string provided by the service (e.g., Google Search Console, Stripe).
For DNS troubleshooting or assistance with complex zone configurations, contact CyclebreezeHost support 24/7 at info@cyclebreezehost.com or via https://clients.cyclebreezehost.com.