Migrating Email from Another Provider
Moving your email to CyclebreezeHost does not have to mean losing your existing messages, folders, or contacts. By using IMAP migration, you can copy all mail from your old provider into your new CyclebreezeHost mailboxes before pointing your MX records. This guide walks through the full migration process.
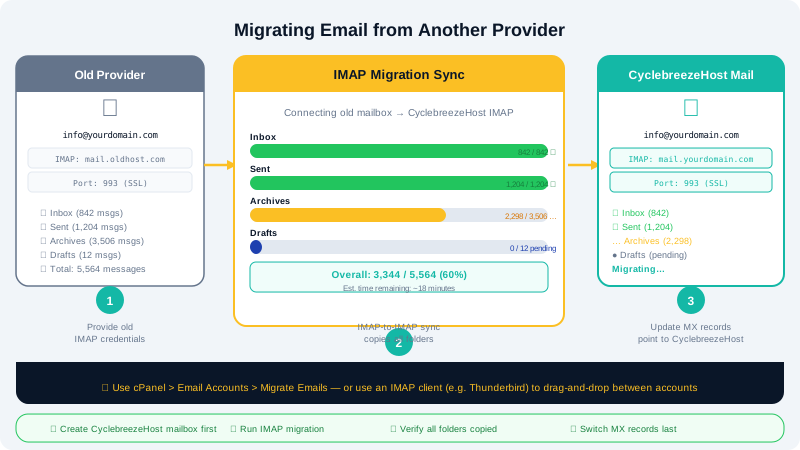
Overview of the Migration Process
- Create mailboxes on CyclebreezeHost.
- Copy messages from the old provider to CyclebreezeHost using an IMAP migration tool.
- Update MX records to point to CyclebreezeHost.
- Confirm all mail is routing correctly and decommission the old provider.
Step 1 — Create Mailboxes in cPanel
- Log in to cPanel via the Client Area at https://clients.cyclebreezehost.com.
- In the Email section, click Email Accounts.
- Click Create and fill in:
- Username (the part before the
@) - Domain (select from the dropdown)
- Password — use a strong password
- Username (the part before the
- Click Create to add the mailbox.
Repeat for every address you are migrating.
Step 2 — Gather Old Provider Credentials
You will need IMAP access credentials for each mailbox at the old provider:
- IMAP server hostname (e.g.
mail.oldprovider.com) - IMAP port — typically
993(SSL) or143(STARTTLS) - Username — usually the full email address
- Password for each mailbox
Check your old provider's documentation or settings panel if you are unsure of the server hostname.
Step 3 — Migrate Mail Using imapsync or a Desktop Client
Option A — Use imapsync (Command Line)
imapsync is an open-source tool that copies mail between two IMAP servers. Run it for each mailbox:
imapsync \
  --host1 mail.oldprovider.com --ssl1 --port1 993 \
  --user1 user@yourdomain.com --password1 OldPassword \
  --host2 mail.yourdomain.com --ssl2 --port2 993 \
  --user2 user@yourdomain.com --password2 NewPassword
Replace the hostnames, usernames, and passwords with your actual values. imapsync will copy all folders and messages while preserving read/unread status and timestamps.
Option B — Use a Desktop Email Client
You can migrate manually using any IMAP-capable email client (Thunderbird, Outlook, Apple Mail):
- Add both accounts (old and new) to the email client as separate IMAP accounts.
- Select all messages in each folder of the old account.
- Drag them to the matching folder in the new CyclebreezeHost account.
- Repeat for every folder, including Sent, Drafts, and any custom folders.
This method is straightforward for small mailboxes but can be slow for large ones.
Step 4 — Verify Messages Have Arrived
- Log in to CyclebreezeHost webmail at
https://mail.yourdomain.com(or via cPanel > Email Accounts > Check Email). - Confirm that messages, folders, and attachments are present.
- Send a test reply to verify sending works.
Step 5 — Update MX Records
Once you are satisfied that all mail has been copied, point your domain's MX records to CyclebreezeHost:
- In cPanel, go to Zone Editor > Manage for your domain.
- Delete the old MX records.
- Add a new MX record pointing to
mail.yourdomain.comwith priority0. - In the Email section, click Email Routing and set it to Local Mail Exchanger.
Propagation takes between 1–24 hours. During this window, some mail may still arrive at the old provider — check both inboxes.
Step 6 — Export Contacts (If Needed)
Most email clients allow you to export contacts as a .vcf (vCard) or .csv file. Import this file into Roundcube webmail via Address Book > Import.
Need Help?
The CyclebreezeHost support team is available 24/7 at info@cyclebreezehost.com or via a support ticket in the Client Area to assist with your email migration.