How to Migrate Your Website to CyclebreezeHost
Moving your website from another host to CyclebreezeHost involves four main steps: copying your files, migrating your database, recreating your email accounts, and then updating your domain's DNS to point to CyclebreezeHost. Done in the right order, you can complete the migration with little to no downtime. This guide walks through the full process.
Before You Start
Gather the following from your current host before you begin:
- Full file backup of your website (all files in your current
public_htmlor equivalent) - A database export in
.sqlformat for any MySQL/MariaDB databases your site uses - Your current database name, username, and password (from your CMS config file)
- A list of your email addresses and any important emails you want to keep
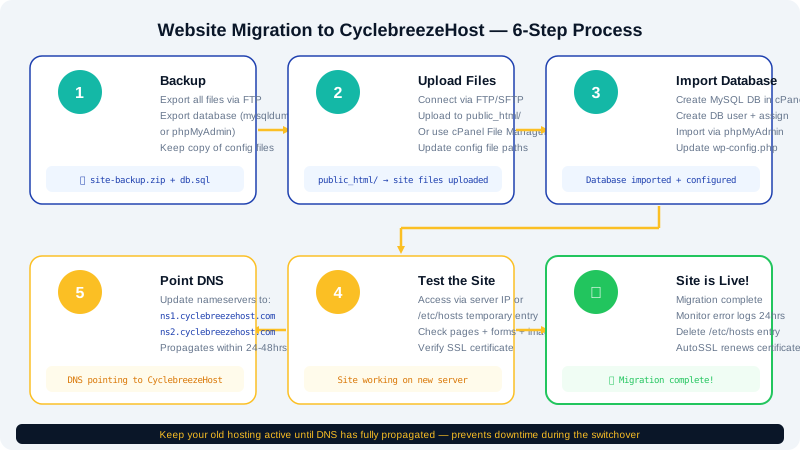
Step 1 — Upload Your Website Files
- Log in to the Client Area at https://clients.cyclebreezehost.com and open cPanel for your new CyclebreezeHost account.
- In cPanel, open File Manager and navigate to
public_html(or the document root of the domain). - Click Upload and upload your site files. For large sites, it is faster to upload a
.ziparchive and then use Extract in File Manager to unzip it in place. - Alternatively, connect via FTP/SFTP using the credentials in cPanel's FTP Accounts section and transfer the files with an FTP client.
Make sure the contents of your old public_html land directly inside public_html on CyclebreezeHost — not inside a subfolder within it.
Step 2 — Create and Import Your Database
If your site uses a database (WordPress, Joomla, Drupal, Magento, etc.):
- In cPanel, open MySQL Databases.
- Create a new database, a new database user, and assign the user to the database with All Privileges. Note the exact names you create — you will need them shortly.
- Open phpMyAdmin in cPanel.
- Select your new database in the left panel.
- Click the Import tab at the top.
- Click Choose File, select your
.sqlexport, and click Go.
Once the import completes, update your site's configuration file to use the new database credentials:
- WordPress: Edit
wp-config.php— updateDB_NAME,DB_USER,DB_PASSWORD, and setDB_HOSTtolocalhost. - Joomla: Edit
configuration.php— update the$db,$user,$password, and$hostvalues. - Other CMS: Refer to your application's documentation for the database config file location.
Step 3 — Test the Site Before Changing DNS
Before pointing your domain to CyclebreezeHost, verify the site works using a temporary preview URL. CyclebreezeHost provides a preview URL in cPanel under Account Information, or you can temporarily edit your local computer's hosts file to resolve your domain to CyclebreezeHost's server IP:
123.456.789.0 yourdomain.com www.yourdomain.com
Replace 123.456.789.0 with your CyclebreezeHost server's IP (found in cPanel under Account Information). Test all pages, forms, and login functionality. Remove the hosts file entry when done.
Step 4 — Recreate Email Accounts
Before switching DNS, recreate your email accounts on CyclebreezeHost so they are ready to receive mail:
- In cPanel, open Email Accounts.
- Click Create and add each email address with its desired password.
If you have important emails to keep, export them from your old host (using Webmail or an email client's export function) and import them into the new Webmail interface at https://yourdomain.com/webmail after DNS propagation.
Step 5 — Update Your DNS
When you are satisfied the site is working correctly on CyclebreezeHost, update your domain's nameservers:
- Domain registered at CyclebreezeHost: Update the nameservers in the Client Area under your domain's management page.
- Domain registered elsewhere: Log in to your registrar and replace the current nameservers with CyclebreezeHost's nameservers. You can find the correct nameservers in cPanel under Account Information.
DNS propagation typically takes 2–24 hours. During this window, some visitors may still reach your old host while others reach the new one. Keep your old hosting account active until propagation is complete and you have confirmed everything is working.
Step 6 — SSL Certificate
CyclebreezeHost's AutoSSL powered by Let's Encrypt will automatically detect your domain once DNS points to CyclebreezeHost and issue a free certificate — usually within a few hours. Monitor status under SSL/TLS Status in cPanel.
Need Help?
CyclebreezeHost offers free website migration assistance. Open a support ticket in the Client Area or email info@cyclebreezehost.com with your current hosting details and the support team will assess your site and assist with the transfer. Support is available 24/7.