How to Set Up an Autoresponder
An autoresponder sends a pre-written reply to every message that arrives at a specific email address. You can use it to let senders know you are out of office, to confirm that a contact form submission was received, or to provide standard information while you are unavailable.
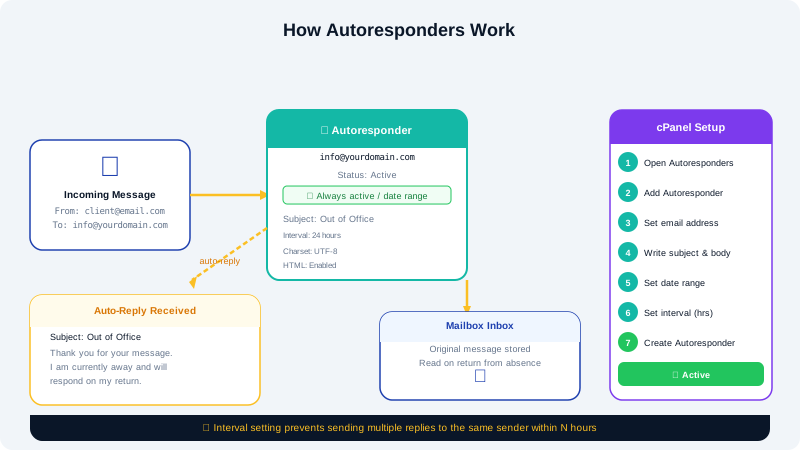
Creating an Autoresponder in cPanel
-
Log in to cPanel at
https://yourdomain.com:2083. -
Under the Email section, click Autoresponders.
-
Click Add Autoresponder.
-
Fill in the form:
- Character Set — leave as
utf-8for standard text. - Interval — the number of hours to wait before sending another auto-reply to the same sender. Set to
24to reply once per day, or0to reply to every message (not recommended for high-traffic addresses). - Email — the local part of the address (e.g.,
info). Select the correct domain from the dropdown. - From — the name that will appear in the reply (e.g.,
CyclebreezeHost Support). - Subject — the subject line of your auto-reply (e.g.,
I'm away until June 20). - HTML — tick this only if your message body uses HTML formatting.
- Body — type your auto-reply message. You can include the placeholder
%subject%to echo the sender's original subject, or%from%to include their name if available.
- Character Set — leave as
-
Optionally, set a Start and Stop time to schedule the autoresponder for a specific date range (e.g., your holiday period).
-
Click Create/Modify to save.
Example Auto-Reply Body
Hi there,

Thank you for your message. I am currently out of the office and will return on Monday, 23 June.

For urgent matters, please contact our support team at info@cyclebreezehost.com.

Best regards,
Your Name
Editing or Removing an Autoresponder
- Go to Email → Autoresponders in cPanel.
- The list shows all active autoresponders.
- Click Edit to update the message, interval, or schedule.
- Click Delete to remove the autoresponder entirely.
Deleting an autoresponder takes effect immediately — no further automatic replies will be sent.
Setting a Date Range (Scheduled Autoresponder)
cPanel lets you define a start and stop time so the autoresponder activates and deactivates automatically. Times are in your server's time zone (shown on the cPanel home screen). Enter the dates and times carefully to avoid the autoresponder running longer than intended.
Tips for Effective Autoresponders
- Keep replies brief — include the key information (return date, alternative contact) without lengthy copy.
- Set a sensible interval — an interval of
24prevents a single sender from receiving dozens of replies over the course of a conversation thread. - Avoid sensitive details — do not include full holiday itineraries or information that could be exploited.
- Test before you leave — send a test message from an external address to confirm the reply arrives correctly.
Troubleshooting
| Problem | Solution |
|---|---|
| No reply being sent | Confirm the autoresponder is saved and the email address is spelled correctly |
| Sender receiving too many replies | Increase the Interval value |
| HTML formatting not rendering | Tick the HTML checkbox and ensure the body is valid HTML |
| Autoresponder still active after return | Log in to cPanel and delete or edit the autoresponder to clear the stop date |
If you need assistance configuring autoresponders, open a ticket at https://clients.cyclebreezehost.com or email info@cyclebreezehost.com. Support is available 24/7.