Setting Up MX Records for Microsoft 365
If you have a Microsoft 365 subscription and want to use your CyclebreezeHost domain with Outlook for business, you need to update your domain's MX (Mail Exchanger) records so email is delivered to Microsoft's servers. This guide walks you through the required changes in cPanel.
Before You Begin
- Complete the Microsoft 365 setup at
admin.microsoft.comand add your domain. Microsoft will provide a domain verification record (usually aTXTrecord). - Note your MX record value — Microsoft generates a unique MX hostname for each tenant in the format
yourdomain-com.mail.protection.outlook.com. - Have your cPanel login details ready.
- MX record changes typically propagate within 1–4 hours but can take up to 24 hours.
Step 1 — Verify Domain Ownership in Microsoft 365
- In the Microsoft 365 Admin Center, go to Settings > Domains and click your domain.
- Follow the prompts to add the TXT verification record Microsoft provides.
- In cPanel, go to Zone Editor, click Manage next to your domain, and add the TXT record.
- Return to the Admin Center and click Verify once DNS has propagated.
Step 2 — Set Email Routing to Remote
- Log in to cPanel via https://clients.cyclebreezehost.com or directly at
https://yourdomain.com/cpanel. - In the Email section, click Email Routing.
- Select Remote Mail Exchanger and click Change.
Step 3 — Remove Existing MX Records
- In cPanel, go to Zone Editor and click Manage next to your domain.
- Filter the record list by type MX.
- Delete all existing MX records pointing to CyclebreezeHost mail servers.
Step 4 — Add the Microsoft 365 MX Record
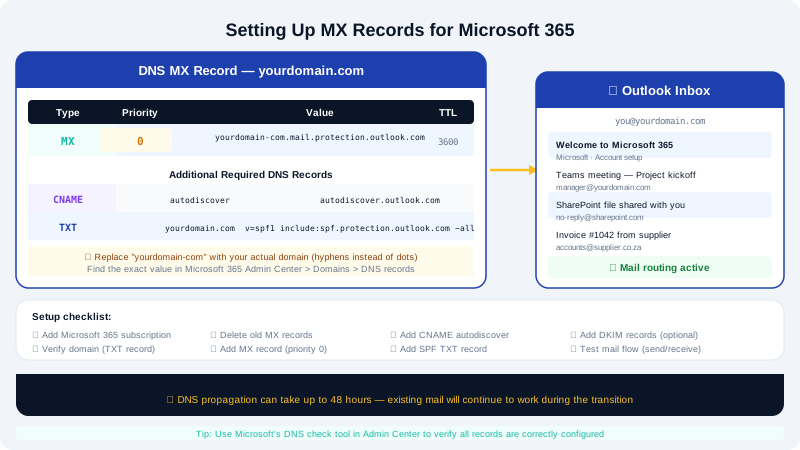
Microsoft 365 uses a single MX record per tenant.
- In Zone Editor, click Add Record and select type MX.
- Fill in the fields:
| Field | Value |
|---|---|
| Name | yourdomain.com. (trailing dot included) |
| TTL | 3600 |
| Priority | 0 |
| Destination | yourdomain-com.mail.protection.outlook.com |
- Replace
yourdomain-com.mail.protection.outlook.comwith the exact value shown in your Microsoft 365 Admin Center under DNS records for your domain. - Click Add Record.
Step 5 — Add Required DNS Records for Microsoft 365
Microsoft 365 also requires several additional DNS records for full functionality:
SPF record (TXT):
- Name:
yourdomain.com. - Value:
v=spf1 include:spf.protection.outlook.com -all
Autodiscover (CNAME):
- Name:
autodiscover - Value:
autodiscover.outlook.com
DKIM records are provided in the Microsoft 365 Admin Center under Settings > Domains > DNS records. Add each as a CNAME in Zone Editor.
Add all records in cPanel Zone Editor following the same steps as above.
Step 6 — Verify in Microsoft 365
- In the Microsoft 365 Admin Center, go to Settings > Domains.
- Click your domain name and then Check DNS.
- Any missing or incorrect records will be highlighted. Correct them in cPanel and recheck after propagation.
After the Switch
- New email will be delivered to Microsoft 365 mailboxes.
- Existing mail in CyclebreezeHost cPanel mailboxes is not automatically migrated. See the Migrating Email from Another Provider article if you need to move old messages.
- Users should configure Outlook or another client using the settings provided by Microsoft 365 setup.
Need Help?
Contact CyclebreezeHost support at info@cyclebreezehost.com or open a ticket in the Client Area — our team is available 24/7.