Setting Up SPF, DKIM, and DMARC
SPF, DKIM, and DMARC are DNS-based email authentication standards. Together they tell receiving mail servers that messages from your domain are legitimate, which improves deliverability and makes it much harder for spammers to impersonate your domain. If your emails are landing in spam folders, missing these records is often the cause.
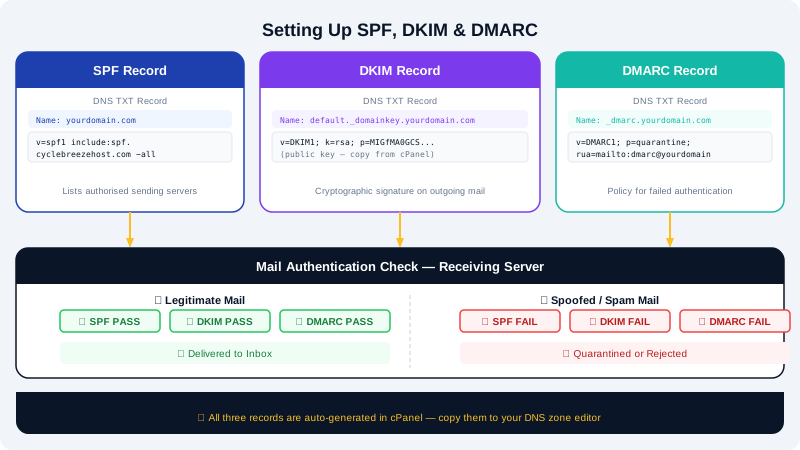
How Each Record Works
- SPF (Sender Policy Framework) — A TXT record that lists the mail servers authorised to send email for your domain.
- DKIM (DomainKeys Identified Mail) — A cryptographic signature attached to outgoing mail. The receiving server checks it against a public key in your DNS.
- DMARC (Domain-based Message Authentication, Reporting & Conformance) — A TXT record that tells receiving servers what to do with mail that fails SPF or DKIM checks (e.g., reject it or quarantine it), and where to send reports.
Step 1 — Enable DKIM in cPanel
CyclebreezeHost generates a DKIM key pair for you automatically. To ensure it is active:
- Log in to cPanel at
https://yourdomain.com:2083. - Go to Email → Email Deliverability.
- You will see a list of your domains. Look for the DKIM row.
- If the status shows Invalid or Not Installed, click Repair and cPanel will install the correct DKIM DNS record automatically (this works when your domain's DNS is managed through cPanel/WHM).
- If your DNS is managed elsewhere (e.g., Cloudflare), click Manage to view the DNS record values, then add them manually to your DNS provider.
Step 2 — Set Up Your SPF Record
cPanel may add a default SPF record during account creation. To check and update it:
- In cPanel, go to Email → Email Deliverability.
- Look at the SPF row for your domain. If the status is valid, no action is needed.
- If it needs repair, click Repair to let cPanel install the recommended record.
For manual DNS management, add a TXT record to your domain's root (@):
v=spf1 include:yourdomain.com ~all
If you also send from third-party services (e.g., Mailchimp, Google Workspace), add their include: entries before the ~all qualifier:
v=spf1 include:yourdomain.com include:_spf.google.com ~all
Only one SPF record is allowed per domain. If one already exists, edit it rather than adding a second.
Step 3 — Add a DMARC Record
DMARC is a TXT record added to the DNS subdomain _dmarc.yourdomain.com. Start with a monitoring-only policy so you can review reports before enforcing rejections.
Add a TXT record for the host _dmarc with this value:
v=DMARC1; p=none; rua=mailto:dmarc-reports@yourdomain.com
| Tag | Meaning |
|---|---|
p=none | Monitor only — no action taken on failing mail |
p=quarantine | Send failing mail to spam |
p=reject | Reject failing mail entirely |
rua= | Address to receive aggregate reports |
Once you have reviewed a few weeks of reports and confirmed legitimate mail is passing, change p=none to p=quarantine and eventually p=reject.
Step 4 — Verify Your Records
After saving DNS changes, allow up to 24 hours for propagation, then verify:
- Return to Email → Email Deliverability in cPanel. All three rows should show green status icons.
- Send a test email to a Gmail or Outlook address and check the message source (
Show originalin Gmail) — look fordkim=pass,spf=pass, anddmarc=passin theAuthentication-Resultsheader.
Troubleshooting
| Problem | Solution |
|---|---|
| DKIM still failing after repair | Check if your domain's nameservers point to CyclebreezeHost or a third-party provider |
| Multiple SPF records | Merge them into one — two SPF TXT records cause failures |
| DMARC reports not arriving | Confirm the rua email address is valid and receiving mail |
| Emails still going to spam | Check third-party sending services also have SPF include: entries |
Need help interpreting DMARC reports or adjusting your DNS? Contact CyclebreezeHost at info@cyclebreezehost.com or open a ticket at https://clients.cyclebreezehost.com.